How to Add a Custom HTML Signature to Apple Mail on macOS (2026 Guide)
A professional email signature remains an essential detail in 2026. Whether you are an independent professional, a founder, or part of a larger organization, a well-designed HTML signature helps ensure consistent branding, clear contact information, and a polished first impression.
Apple Mail supports HTML signatures on macOS, but the configuration is not exposed in the user interface and requires a few careful manual steps. This guide explains the correct and safe way to add a custom HTML signature to Apple Mail without breaking the internal structure Apple Mail depends on.
While it’s not as easy as it should be, you don’t require advanced technical knowledge to follow this guide.
What You Will Achieve
By following this guide, you will end up with a clean, professional HTML signature in Apple Mail that looks the way you expect and is applied consistently when composing new emails.
- Add a custom HTML signature with your own layout, links, and branding
- Use the same signature reliably across your outgoing emails
- Have a setup you can keep using without constantly redoing it
Step 1: Create Your HTML Signature
Start by preparing the HTML code for your signature. This can be done by writing the HTML yourself or by using an external signature generator and exporting the result. There are a lot of signature generators and templates on the internet. Or use the one provided by your company.
Apple Mail works best with simple HTML and inline CSS. Avoid JavaScript, embedded stylesheets, or complex layouts.

Here’s the HTML code for the signature shown above:
<body style="font-size: 9pt; font-family: Arial, sans-serif;">
<div style="display: inline-block;">
<span style="font-weight: bold;">John Doe<br></span>
<span style="line-height: 15px;">Sales & Marketing Director<br></span>
<div style="margin: 6px 0; height: 1px; background-color: #1e6bff; width: 100%;"></div>
<p style="padding-top: 6px; padding-bottom: 0px; margin: 0px; font-size: 9pt; line-height: 15px;">
<span>
<strong>P:</strong> <span>(800) 555-0199</span>
<span> | </span>
</span>
<span>
<strong>M:</strong> <span>(800) 555-0299</span>
</span>
</p>
</div>
</body>Step 2: Create a Signature Placeholder in Apple Mail
Apple Mail must first create a signature file before it can be customized.
- Open Apple Mail
- Go to Mail → Settings → Signatures
- Select the email account you want to use
- Click the “+” button to add a new signature
- Enter temporary placeholder text (for example, your name)
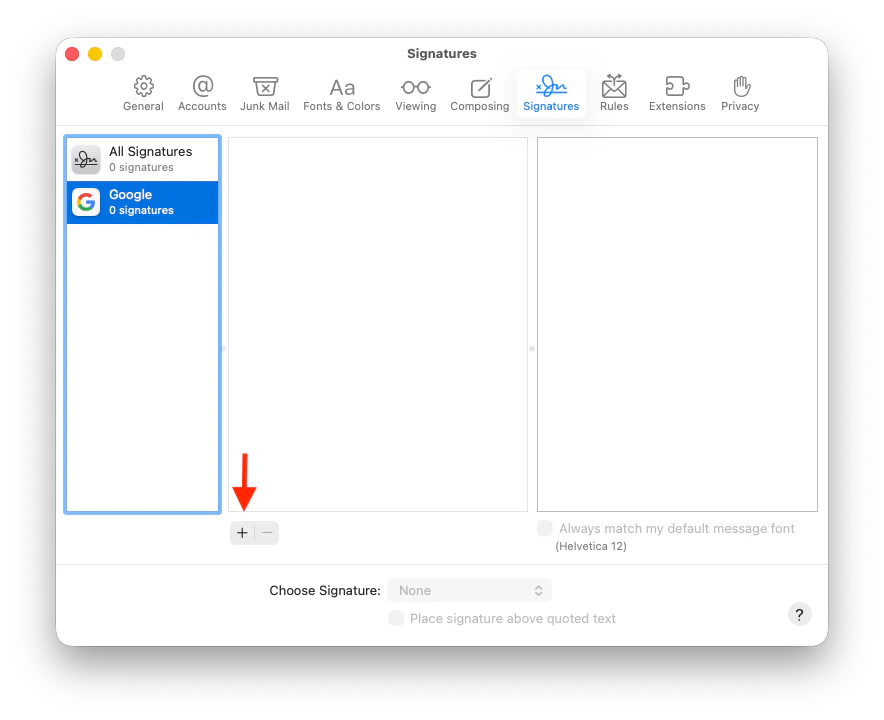
This step ensures Apple Mail generates the correct signature file on disk.
Step 3: Fully Quit Apple Mail
Before modifying any files, Apple Mail must be completely closed. If Apple Mail remains open, it may overwrite your changes.
Step 4: Locate the Signature Files on macOS
Apple Mail stores signatures in your user Library.
- Open Finder
- Select Go → Go to Folder…
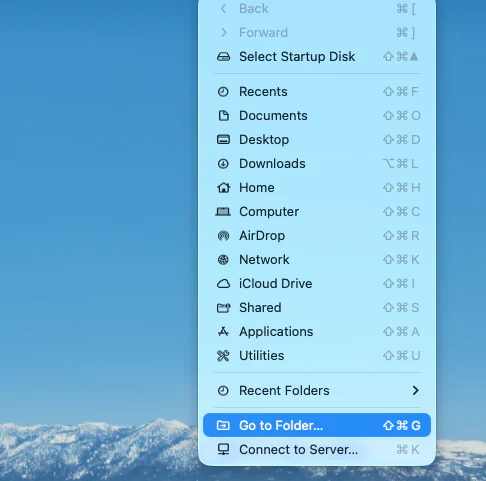
- Enter the following path:
~/Library/Mail/- Open the most recent versioned folder (for example
V10,V11, or similar). - Navigate to:
MailData/Signatures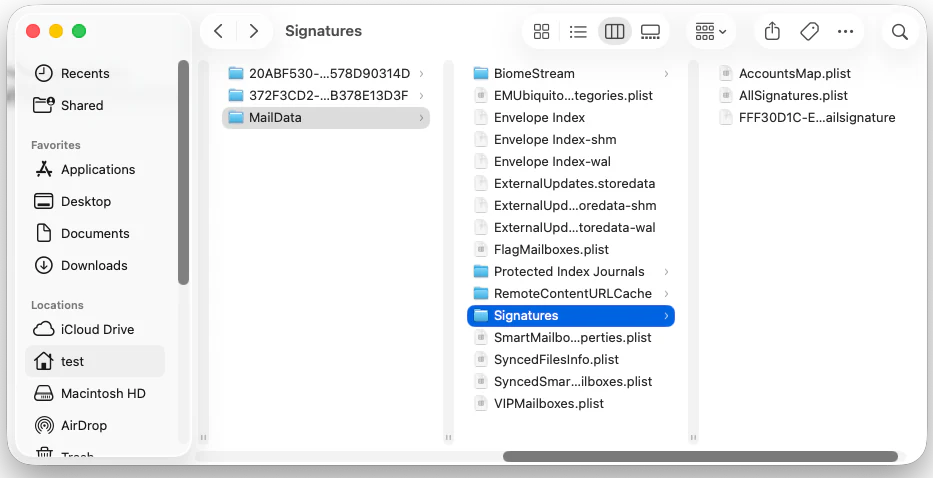
You will see one or more files ending in .mailsignature.
Step 5: Open the Correct Signature File
Each signature corresponds to one file. Sort the folder by Date Modified, open the most recently modified signature file (or the only signature file if you have only one), and use TextEdit, VSCode or a similar code editor. The beginning of the file will look something like this:
Content-Transfer-Encoding: 7bit
Content-Type: text/html;
	charset=us-ascii
Message-Id: <FF679A69-D68Y-4259-8D68-946D59F081A4>
Mime-Version: 1.0 (Mac OS X Mail 16.0 (3776.700.51.11.1))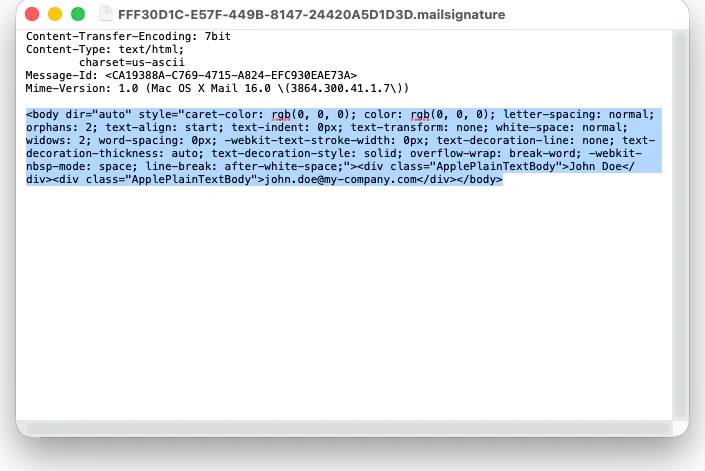
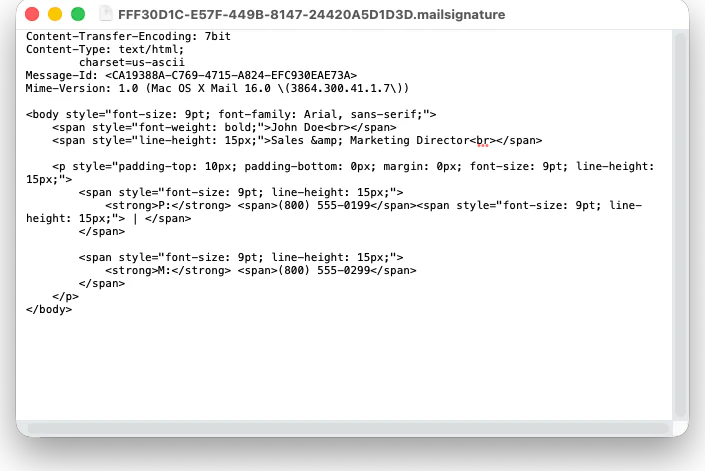
Step 6: Replace Only the HTML Body Content
Do not remove or modify the header or metadata at the top of the file.
Apple Mail depends on this information. Replace only the content inside
the <body> tag, then save the file.
Step 7: Lock the Signature File
To prevent Apple Mail from reformatting or overwriting your signature, right-click the signature file, choose Get Info, and enable Locked.
Step 8: Reopen Apple Mail and Verify
Reopen Apple Mail, compose a new email, and confirm your signature renders correctly. If the signature is not applied automatically, select it from the signature menu in the message composer.
Notes and Limitations
- Each mail account has its own signature file.
- Apple Mail intentionally ignores certain CSS properties.
- Make sure not to use hardcoded colors if you want dynamic behavior for people using dark mode.
-
Images must use absolute URLs (
https://...) and be hosted in a stable environment. You can’t change the path once you’ve sent a mail, which will likely result in missing images in older mails. - System or app updates may require repeating these steps (especially changing the version path). iCloud syncs this information, but may also overwrite the content.
Conclusion
Apple Mail supports HTML signatures, but the process is manual and sensitive to changes. Understanding how the system works allows you to implement a reliable signature, but maintaining it across accounts or devices can become time-consuming.
If you prefer a more maintainable workflow, there are dedicated macOS tools that help create and manage HTML signatures visually. Tools such as Sigline exist to simplify the process, while the manual method described above provides the foundation for how Apple Mail handles HTML signatures.